
Integrating Mercurial Source Control into Visual Studio
SummaryShows how to integrate Hg Mercurial source control tool to Visual Studio
Procedures- Install HgSccPackage from http://www.newsupaplex.pp.ru/hgscc_news_eng.html. On the web page look for �Download version 1.8.5 Size ~ 650 Kb� in the download section.
- The installation experience was not great. But after about 5-8 minutes, go to Programs and Features, you should see HgSccPackage listed there.
- Now start Visual Studio, go to �Tools� -> �Options� -> �Source Control� -> �Plug In Selection� and select �Mercurial Source Control Package�.
- Immediately, you will see in the solution explorer, every folder and file will have a lock symbol, see diagram below.
- If it is a new solution, right click on the solution name and select �Mercurial� -> �Add to source control�. [+] icons will appear on every item in the solution explorer.
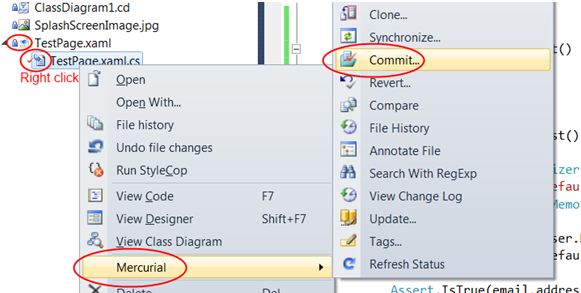
- When you start modifying a file, the symbol will change to a pencil. After saving the change, the symbol changes to a tick.
- To push the changes to the server, right click the file and follow the steps in the diagram:
- The above step only commits the changes, not pushing onto the server. To push the changes to the server, you have to repeat step 3 of Creating Project Content and Push to Source Control Server.
- To integrate a new project you may need to follow the steps in previous sections, namely,
- add repository on server,
- clone the repository to developer machine,
- add project to repository folder. The new projects will be automatically integrated.